
Preparing winter squash

Peeling winter squash can be a challenge. The thin-skinned varieties (acorn, butternut, delicata and sweet dumpling) can be peeled with a paring knife or vegetable peeler.
Most recipes using these varieties call for cutting the squash in half. Position the squash on a cutting board, stem end facing you. Place the blade of a heavy chef’s knife horizontally along the length of the squash. With a hammer or mallet, repeatedly hit the back of the blade near the handle to drive it into the squash until it breaks in half.
Place the larger varieties (Hubbard and Turk’s Turban) on newspaper and use a sharp cleaver to split the hard-rind open. Or use the chef’s knife method described above. Once you have a slit cut, bang on a hard surface and pull apart. Pieces are easier to peel. With a spoon, scoop out the seeds and strings and discard, or set aside if you plan to roast the seeds.
Spices and Herbs

USING FRESH VS. DRIED
> Whole dried spices and herbs release flavor slower than ground spices and herbs
> Ground dried herbs release flavor quickly and have a stronger flavor than fresh herbs
> One teaspoon of dried herbs = 3 teaspoons of fresh herbs
> Add fresh herbs at the end of cooking
STORING SPICES AND HERBS
> Dried spices and herbs are stored best in an airtight container in a cool, dry and dark area.
> Spices and herbs lose flavor over time. For best flavor, use ground spices within a year and whole spices within 2 years.
> Fresh herbs are best stored upright with stems in water
> Spices and herbs can be expensive, so look for sales, buy a small amount at a time, or share a large container with someone.
Curried Turkey Salad with Apples and Raisins

Take advantage of the great apple selection at the Dubuque Winter Farmers’ Market this Saturday, and pair them with leftover Thanksgiving turkey. Enjoy this salad with crackers, or spread it on bread for a delicious sandwich.
INGREDIENTS
1/2 cup low-fat mayonnaise
2 teaspoons curry powder
4 teaspoons water
2 cups chopped turkey
1-1/2 cup chopped apple (Braeburn or similar, about 2 small)
2/3 cup diced celery
6 tablespoons raisins
1/4 teaspoon salt
DIRECTIONS
Combine mayonnaise, curry powder, and water in a medium bowl, stirring with a whisk until well blended. Add the turkey, chopped apple, celery, raisins, and salt; stir mixture well to combine. Cover and chill.
Roasted Potatoes with Mexican Spices
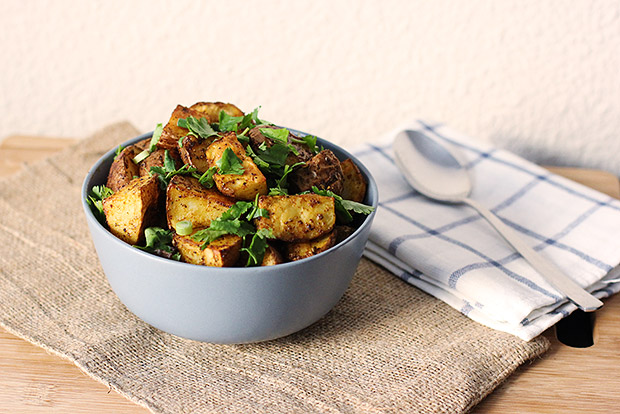
Spice up your Thanksgiving this year with a different spin on potatoes.
INGREDIENTS
2 lbs. red or white skinned new potatoes, quartered
1 tbsp olive oil
1/2 tsp ground cumin
1/2 tsp chili powder
1/2 tsp dried oregano
1/8 tsp ground cinnamon
1/2 tsp salt
1/2 cup chopped fresh cilantro
2 spring onions, sliced
DIRECTIONS
Preheat the oven to 400 degrees Fahrenheit. Spray a baking sheet with non-stick cooking spray and set aside.
Place the cut potatoes in a large bowl. Add the olive oil and sprinkle in the cumin, chili powder, oregano, cinnamon, and salt. Use a large spoon to stir the potatoes until each piece is evenly coated in oil and spices.
Transfer the potatoes to the baking sheet and spread them in a single layer. Bake for 20 minutes. Remove from the oven and use a spatula to gently stir the potatoes to release any that may be stuck to the baking pan. Cook an additional 15 to 20 minutes, until the potatoes are browned and tender.
Transfer the potatoes to a serving bowl and sprinkle with the fresh cilantro and sliced spring onions. Serve warm.
Recipe from www.myfooddiary.com
Slow Roasted Beef

INGREDIENTS
1 boneless eye-round roast (3-1/2 to 4-1/2 pounds)
4 teaspoons kosher salt or 2 teaspoons table salt
2 teaspoons vegetable oil plus 1 tablespoon
teaspoons ground black pepper
DIRECTIONS
1. Sprinkle all sides of roast evenly with salt. Wrap with plastic wrap and refrigerate 18 to 24 hours.
2. Adjust oven rack to middle position and heat oven to 225 degrees.
3. Pat roast dry with paper towels; rub with 2 teaspoons oil and sprinkle all sides evenly with pepper. Heat remaining tablespoon oil in 12-inch skillet over medium-high heat until starting to smoke.
4. Sear roast until browned on all sides, 3 to 4 minutes per side. Transfer roast to wire rack set in rimmed baking sheet.
5. Roast until meat-probe thermometer or instant-read thermometer inserted into center of roast registers 115 degrees for medium-rare, 1-1/4 to 1-3/4 hours, or 125 degrees for medium, 1-3/4 to 2-1/4 hours.
6. Turn oven off; leave roast in oven, without opening door, until meat-probe thermometer or instant-read thermometer inserted into center of roast registers 130 degrees for medium-rare or 140 degrees for medium, 30 to 50 minutes longer. Transfer roast to carving board and let rest 15 minutes.
7. Slice meat crosswise as thinly as possible and serve.
NOTE: Serves 6 to 8. We don’t recommend cooking this roast past medium. Open the oven door as little as possible and remove the roast from the oven while taking its temperature. If the roast has not reached the desired temperature in the time specified in step 3, heat the oven to 225 degrees for 5 minutes, shut it off, and continue to cook the roast to the desired temperature. For a smaller (2-1/2- to 3-1/2-pound) roast, reduce the amount of kosher salt to 3 teaspoons (1-1/2 teaspoons table salt) and black pepper to 1-1/2 teaspoons. For a 4-1/2- to 6-pound roast, cut in half crosswise before cooking to create 2 smaller roasts. Slice the roast as thinly as possible and serve with horseradish, if desired.
Credit: Cook’s Illustrated
Kitchen Knife Safety
Keep your knives sharp. But be sure to keep them out of reach of children. Dull knives can slip while you’re cutting. Also, you’re more apt to be careful with sharp knives.
Slice away from your hand and keep your fingers clear of the blade. Slicing away from your hand prevents an accidental cut if the knife slips.
When mincing, keep the tip of your knife on the cutting board and pump the handle up and down quickly. However, because that knife is moving fast, be extra careful about your fingers.
Curl your fingers under and hold the food with your fingertips when chopping. Better to ding a knuckle than slice a fingertip!
Secure your cutting board. If it doesn’t have rubber feet to help grip the counter, put a damp towel under the board when cutting.
Never slice things freehand over the sink. That’s just an accident waiting to happen!
Sautéed Kale

Kale is a “super food” packed full of vitamins, fiber, iron, and calcium – but how do you cook it? This simple recipe is an easy way to get these nutritious greens onto your menu:
1-1/2 pounds kale or collard greens
1 Tablespoon vegetable oil
2 cloves garlic, chopped
1 cup water or chicken broth
Salt and pepper to taste
2 Tablespoons cider vinegar (optional)
Wash the kale under running water and break off the stems.
In a large skillet with a cover, sauté the onions and garlic in the oil.
Dry the Kale and chop or tear into 1/2 inch pieces. It makes a pretty good pile.
Add greens to water or broth. Cover and simmer for 4 minutes. Remove cover, continue cooking, stirring constantly until greens have wilted. Add salt and pepper to taste.
Sprinkle cider vinegar on mixture. The greens will really shrink down while cooking.
Credit: Spend Smart. Eat Smart.
Cleaning kale

Do you want to try kale, but those curly leaves have you stumped on how to remove them? Check out this video and learn how to strip kale.
Apple Cranberry Crisp

Use firm cooking apples for making apple crisp-Rome Beauty, Baldwin, Jonathan, Braeburn, or Jonagold. These apples will hold their shape during baking so you do not end up with something that looks like applesauce or puree.
Ingredients
1/2 cup all purpose flour
1/2 cup old-fashioned oatmeal
1/2 cup each, granulated sugar and brown sugar
1/2 teaspoon cinnamon
1/2 teaspoon nutmeg
1/2 stick (1/4 cup) chilled butter or margarine cut into small pieces
7 cups peeled diced apples (about 3 pounds)
3 tablespoons apple juice or cider
1/2 cup dried cranberries
Preheat oven to 375°F. Lightly coat eight-inch baking dish with cooking spray or oil and set aside. In a bowl, combine flour, oatmeal, brown sugar, granulated sugar, cinnamon, and nutmeg until well blended. Cut in chilled butter using a pastry blender or clean fingers until the mixture is crumbly. In another bowl, combine apples, apple juice and cranberries. Spoon the apple mixture into prepared pan. Sprinkle with crumb mixture. Cover with foil and bake for 30 minutes. Uncover and bake an additional 20 minutes or until golden brown. Serve warm topped with vanilla ice cream or whipped cream.
Yield 9 servings. Credit: University of Illinois Extension
Storing Apples

Apples can be best kept in the refrigerator, preferably in the crisper drawer or an unsealed plastic bag. It is important to remember to store fresh vegetables separately because apples release ethylene gas that can be damaging to other fruits and vegetables. Fresh apples can also be kept at room temperature for several days before eating but the more time they are kept at room temperature the sooner they will begin to shrivel and lose flavor as well as crispness.

